RainedOut Web Widget |
Top Previous Next |
|
Found on the Settings page in RainedOut.
The RainedOut Web Widget allows you to embed RainedOut alerts directly into your own website.
When you send a message to Send to Everyone, RainedOut will also send that alert to any Web Widgets you may have set up.
Note: Alerts sent to Groups will not trigger Web Widgets, as the widgets are tied to the "Send to Everyone" feature only.
Setting up a Web Widget is easy.
To set up your Web Widget:
1. Open the Settings page in RainedOut
2. Under Service Options, locate the Web Widget setup.
3. Click "Add Web Widget"
4. Set a Duration Interval.
If there are no active messages, the widget will simply return a blank, empty table.
5. Click Save
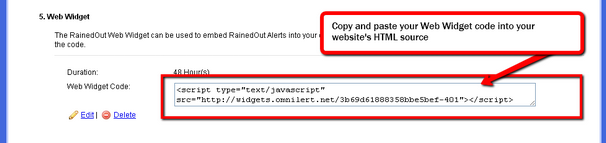
6. Copy and Paste your RainedOut Widget Code
Once you've saved your <%TITLE% Web Widget, RainedOut will provide you code. Simply copy and paste this code into the HTML source of your web page. Your RainedOut Web Widget code is pre-built for you. Just copy and paste into your website's HTML.
Once your widget code is placed inside a web page, it will display your alerts if/when there is an active message, along with an icon linking to your My RainedOut Page.
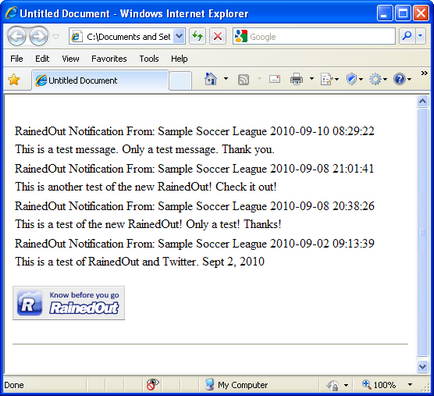
Here's an example without any "style" added:
Without ANY web page style, the RainedOut Web Widget will return a simple table and a graphical link to your My RainedOut Page.
Styling Your RainedOut Web Widget
You can restyle the look/feel of the messages returned using CSS (Cascading Stylesheets). By adding style definitions to your web page or linked stylesheet, you can customize how your widget looks.
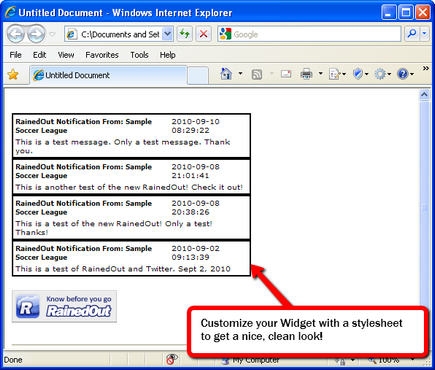
The same exact Widget as above, but this time with a stylesheet added!
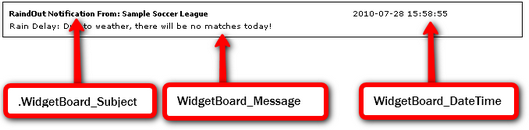
The following CSS style classes are associated with the RainedOut Web Widget:
Here's an example a typical Widget with custom CSS styles applied...
Each item in the Widget has it's own style class. Simply add these classes to your website's stylesheet
here's the CSS styles used in the example shown above:
.Widgets_Table{ padding: 5px; font-family: Verdana, Arial, Helvetica, sans-serif; border: thin solid #000000; width: 60%; font-size: 10px; } .WidgetsBoard_Row{ font-family: Verdana, Arial, Helvetica, sans-serif; } .WidgetsBoard_Subject{ font-family: Verdana, Arial, Helvetica, sans-serif; font-weight: bold; font-size: 9px; } .WidgetsBoard_DateTime{ font-family: Verdana, Arial, Helvetica, sans-serif; font-variant: small-caps; font-size: 10px; } .WidgetsBoard_Message{ font-family: Verdana, Arial, Helvetica, sans-serif; font-size: 10px; }
Of course, with CSS, the possibilities are nearly endless. You can completely redefine each of these to set your own colors, fonts, sizes, and more. For more information on using CSS to style your website, please visit http://www.w3schools.com/css/ |